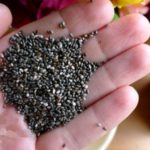
Saving Seeds From Your Garden
Photo: gardenista
Most of you are just getting your Seeds sown now, or starts planted in your garden, so saving seeds is something you are probably not thinking about at this time. Seed Saving is something very important to consider, though, and I’d like you to add it to your planning for your harvest this season, because there may come a time when Heirloom Seeds aren’t as available as they are now. Our ancestors always made it a habit of saving back Seeds every year. It was their way of becoming more Self-Sustaining. But remember, only seeds from open-pollinated, not hybrid, plants will produce the same crop next year.
East To Save Seeds
Seeds of tomatoes, peppers, melons, and winter squash are ready for saving when the fruits are ripe and ready to eat.
Peppers
Peppers are the easiest. The seeds are mature after the peppers have changed color, indicating final ripeness. Cut the peppers open, scrape out the seeds onto a plate—reserving the flesh for eating—and let the seeds dry in a non humid, shaded place, testing them occasionally until they break rather than bend. What could be simpler?
(Note: Dry all wet seeds on a glass or ceramic plate. Spread the seeds evenly over the surface of the plate and stir twice daily to ensure even drying and to keep them from clumping together. Don’t dry seeds on paper plates or paper towels—they’ll stick like glue. A food dehydrator set at 85º F works well, but don’t dry them in a warm oven or any place the temperature exceeds 95º F.)
Tomatoes
Saving tomato seeds takes a little more time, but it’s just as easy. Harvest ripe tomatoes from several different vines of the same variety, cut each across the middle, and gently squeeze the juice and seeds into a bowl. You’ll see that each tomato seed is encased in a gelatinous coating. (This prevents the seed from sprouting inside the tomato). Remove this coating by fermenting it. This mimics the natural rotting of the fruit and has the added bonus of killing any seed borne tomato diseases that might affect next year’s crop.
To ferment the seeds, add about half as much water as there are tomato seeds and juice in the bowl and stir the mixture twice a day for about 3 days. Keep a close eye on the mixture—especially if it’s a warm area, as fermentation happens more quickly at high temperatures. As the mixture ferments, its surface will become covered with white or gray mold. Don’t keep the bowl in the kitchen, anywhere it can be tipped over by animals or children, or where you’d be able to smell it—it will get pretty rank.
When bubbles begin to rise to the top of the mass, or when a thick coat of mold has formed, stop the fermentation by adding enough water to double the mixture, and stir vigorously. The clean, good seeds will settle to the bottom of the bowl. Gently pour off mold, debris and any seeds that float (they’re hollow). Add more water and repeat the process until only clean seeds remain.
Capture the seeds to be saved by pouring the liquid through a strainer, wipe the strainer bottom with a towel to remove asmuch moisture as possible, then dump the seeds onto a glass or ceramic plate to dry. Stir twice a day to ensure even drying and to prevent the seeds from clumping together. Warning: Tomato seeds will germinate unless you dry them quickly. To speed drying, you can use a fan, but don’t put the seeds in sunlight or an oven.
Melons and Squash
Muskmelons, watermelons, and winter squash? Super easy. Cut muskmelons open, scoop the seeds into a strainer, rinse, and set out to dry. Watermelons are almost as easy. Put the seeds in a strainer and add a dash of dishwashing liquid to remove any sugar left on the seeds. Rinse and dry.
Winter squashes need to be carefully cut to expose the seed cavity. Don’t cut straight through the center of the squash—you’ll cut through some seeds, too. Just stick the knife in as far as necessary to cut through the flesh and move it around the circumference. (Be careful—some squashes will fight back!) Pull the seeds from the fibers, rinse, and dry. And don’t cut a squash before you’re ready to eat it—seeds can be saved from most winter squashes many months after harvest (although a few of the long-storage varieties may have sprouted seeds inside after 6 months or so).
Seeds That Need More Time
Eggplants, cucumbers, and summer squashes must ripen beyond the normal, ready-to-eat stage to allow viable seeds to develop inside.
Eggplants
To save the seeds of your eggplants, you’ll need to wait until the fruits are far past the stage when you’d pick them for eating. Any seeds saved from table-ready eggplants will be immature and won’t be viable. If left on the plant, purple eggplant varieties will ripen to a dull brownish color, green varieties to a yellowish green, and white varieties to golden. Eggplants ready for seed saving will be dull, off-colored, hard, and sometimes shriveled.
Cut the ripe eggplants in half and pull the flesh away from the seeded areas. If you want to save more than a few seeds, use a food processor or blender to mash the flesh and expose the seeds. Process (without peeling) and put the pulp in a bowl. Add water, let the good seeds settle, and then pour off the water and debris. Repeat until only clean seeds remain. Add a bit more water and pour the mix through a strainer with a mesh fine enough to catch the tiny seeds. Dry the bottom of the strainer with a towel to absorb excess moisture and dump the seeds out onto a plate to dry.
Cucumbers
After cucumbers ripen, they change color and become soft. (Remember, if you stop picking the cucumbers, their vines will stop producing new fruit, so pick your fruit for seed saving toward the end of the season.)
Cut the ripe cucumber in half and scrape the seeds into a bowl. To remove the seeds’ coating, rub them gently around the inside of a sieve while washing them or soak them in water for 2 days. Rinse and dry. (Note: Make sure the cucumbers you use for seed are disease-free; some diseases can be carried on seed and could affect your future crop.)
Summer Squashes
You’ll need to let summer squashes ripen past the tender stage, too. When you can’t dent the squash with a fingernail, the fruit is at the right stage for seed saving. Pick it, cut it open, scrape the seeds into a bowl, wash, drain, and dry.
Bean and Pea Seeds
To save beans and peas, wait until the pods are ripe. When beans and peas are fully ripened, they turn dry and crackly on the vine, and their seeds rattle inside the pods. This may take a couple more weeks past when you normally harvest your peas and beans to eat. After you collect the pods from the plants, spread them out in a well-ventilated area to dry. Let them dry for at least 2 weeks before shelling.
Source: Danny Look
Original posting: https://www.facebook.com/theseedguy/posts/618594368277489:0
You can purchase your beginning heirloom seeds at this link: The Seed Guy
 This is an aggregated site. Please be aware some of the sites we link to could have pop ups. We have no control over them. However, we will never link you to a site that requires you to make any purchase to view the blog.
Please read our disclaimer. We provide you with information from various sites all over the world. The author’s expressed opinion isn’t necessarily that of The Prepared Page or its staff. Our intent is to bring you the information. Use your and your own best judgment when using any information contained within the blogs.
While you’re here check out some of the other posts you may find them interesting!!!
Some posts may contain affiliate links.